

Not long ago, a salon owner told me she tried to make her own lotion but kept ending up with thin, watery batches. She wanted to offer her own product line, but the process felt confusing.
Many businesses face this same challenge when they try to learn the body lotion making process.
At TY Cosmetic, we support brands at every stage. Our team has years of manufacturing experience, and we help clients avoid common mistakes and build stable products.
In this guide, you will see the full step-by-step process. It will give you a clear path, so you understand what to do and feel sure your search intent is met.
Take a moment to get ready to look at the process in a simple and easy way.
Let’s get started now!
Quick Overview Chart
Many teams like to see the whole process at a glance before they begin. This table gives you a simple view of each step. It can help you follow the guide with more confidence.
| Step | Step Main Action | What You Handle | Key Goal |
| 1. GMP Prep & Sanitation | Clean and sanitize | Tools, surfaces, PPE | Safe workspace |
| 2. Weigh Raw Materials | Measure by weight | All ingredients | Accurate formula |
| 3. Heat Water Phase (A) | Warm to set temp | Water, humectants | Ready for mixing |
| 4. Heat Oil Phase (B) | Warm to match water | Oils, butters, emulsifiers | Melt and prepare |
| 5. Emulsification | Combine A + B | Water phase + oil phase | Create emulsion |
| 6. Cooling | Cool with slow mixing | Full batch | Build texture |
| 7. Add Heat-Sensitive (C) | Add at low heat | Actives, preservatives, fragrance | Protect ingredients |
| 8. Final Mixing | Adjust and blend | Full formula | Smooth texture |
| 9. pH Testing | Test and adjust | Batch sample | Safe pH range |
| 10. Filling & Packaging | Fill containers | Bottles, tubes, jars | Ready for use |
Step#1 Implement GMP-Compliant Preparation & Sanitation
A clean and controlled workspace is the first thing every business needs before starting a batch. This step protects your lotion from contamination and supports basic GMP standards. It also gives your team a stable and safe environment for the next stages.
Set Up a Clean and Safe Workspace
- Sanitize All Tools and Surfaces: Use 70% isopropyl alcohol to clean equipment, tables, and containers. This removes dirt and microbes that may affect product safety. A clean surface lowers the risk of contamination and supports consistent results.
- Use Proper Protective Gear: Wear gloves, masks, coats, and hairnets at all times. This helps prevent outside particles from entering the batch. It also keeps the production area more controlled and reduces avoidable problems.
- Keep the Workspace Clear and Organized: Remove clutter and reduce traffic in the production area. A tidy space prevents accidental contamination and makes it easier to follow each step. It also improves workflow and supports smoother operations.
A clean environment is the foundation of any lotion formula. When your workspace is controlled, your batches are more stable, and your team works with fewer errors. This preparation step also protects your product from issues that are hard to fix later.
Follow Basic GMP Documentation Practices
- Record Each Step Before and During Production: Set up batch notes before you begin and write down every action. This keeps your process traceable and helps when reviewing results. It also supports product consistency across batches.
- Check Equipment Condition and Calibration: Make sure your scales, mixers, and thermometers work well. Proper calibration improves accuracy and reduces errors. These checks help prevent problems during heating and mixing.
- Document All Sanitation Work: Note the cleaning steps you completed for each batch. This ensures repeatable sanitation practices and helps with compliance. It also strengthens your quality control process.
Good documentation builds trust in your operation. It shows that your team follows a clear and repeatable system, which is important for B2B production. It also supports you during audits and helps trace any issues if they arise.
Step#2 Weigh & Document All Raw Materials
This step helps you keep your formula accurate and repeatable. Precise weighing ensures each batch matches the approved formula. Clear documentation also supports GMP and makes problem-solving easier later.
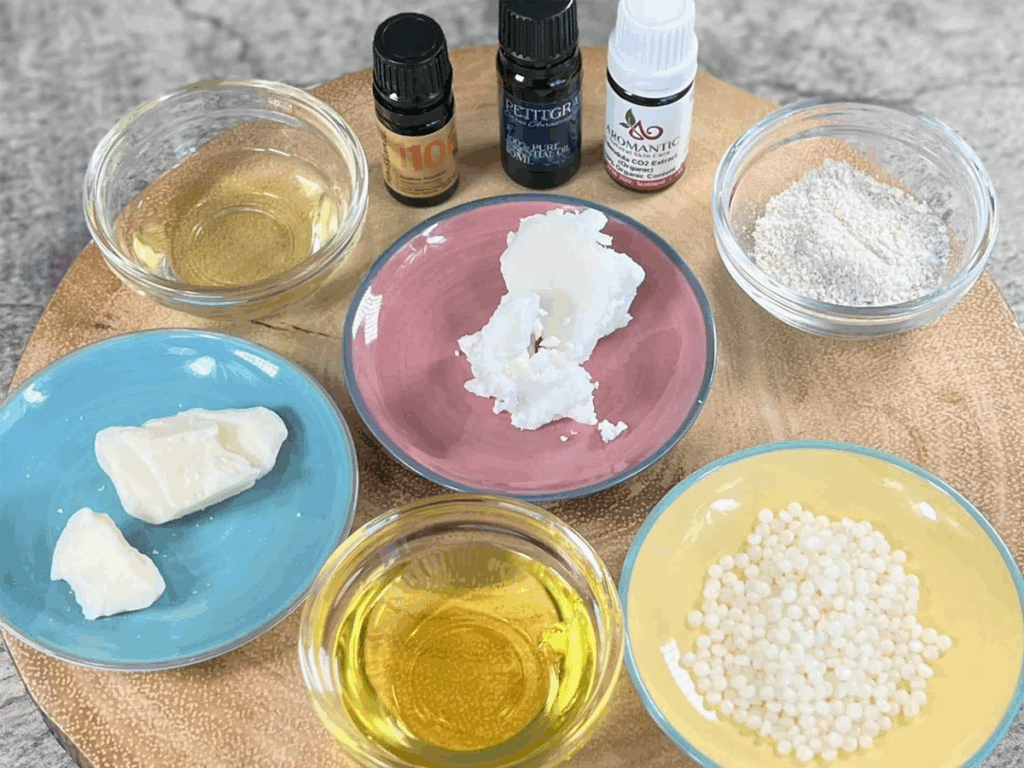
Prepare and Measure All Ingredients
- Use Calibrated Digital Scales: Digital scales help you measure each ingredient by weight, not volume. This keeps your formula stable and reduces changes in texture or performance. Accurate scales also make it easier to scale from small test batches to larger runs.
- Separate Ingredients by Production Phase: Place water phase, oil phase, and heat-sensitive ingredients in different containers. This helps reduce mix-ups and keeps the workflow simple. It also lowers the chances of errors during heating.
- Check Each Material Before Weighing: Review ingredient labels, lot numbers, and expiration dates. This ensures you use safe and fresh ingredients. It also supports cleaner and more reliable record-keeping.
Measuring ingredients with care helps your team avoid production issues. When the formula is accurate, the next steps become easier and more predictable. It also builds stronger batch-to-batch consistency.
Document Every Ingredient and Measurement
- Record Ingredient Names, Lots, and Exact Weights: Write down each material along with its lot number and weight. This gives you a clean paper trail for quality control. It also helps you track any problems that may show up later.
- Use Standardized Batch Sheets: A clear batch sheet keeps all information in one place and helps the team follow the same steps. It reduces confusion and supports smoother production. It also makes audits easier.
- Verify Measurements Before Moving to Heating: Double-check that every weight matches the formula. A quick review helps prevent mistakes that are costly to fix. It also lets you move to the heating steps with confidence.
Good documentation helps your team stay organized and consistent. It supports GMP and gives your process structure. This step prepares you well for the next stages of heating and mixing.
Step#3 Heat the Water Phase (Phase A)
The water phase is the base of your lotion. Heating it helps dissolve key ingredients and prepares it for mixing with oils. This step also supports a stable emulsion later in the process.
Prepare the Water Phase Ingredients
- Use Distilled or Deionized Water
This type of water reduces the risk of minerals or impurities entering your batch. It helps protect product stability and keeps the formula clean. Many B2B operations use filtered water systems for this reason. - Add Humectants and Water-Based Ingredients
Glycerin, propanediol, and other humectants dissolve well when heated. This makes the lotion smoother and more even. It also helps improve the final skin feel of the product.
Preparing the water phase with care helps your formula start on the right path. It reduces early errors and makes the next heating step more predictable. This also gives your team a clean base for the full emulsion.
Heat the Water Phase to the Right Temperature
- Heat to 70–75°C (158–167°F)
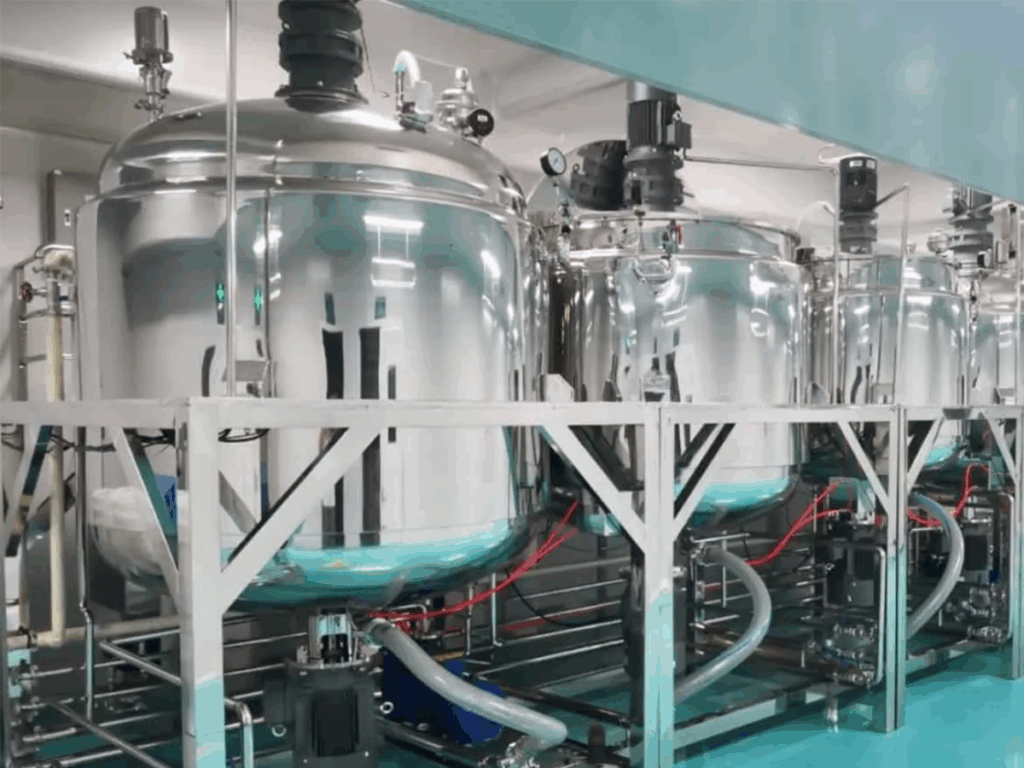
This temperature helps dissolve solids and prepares the phase for emulsification. It also keeps the process safe by lowering microbial risks. Staying within this range supports a stable final texture. - Keep the Temperature Even While Heating
Use a double boiler or a controlled heating tank to keep the heat steady. Uneven heat can cause clumping or poor mixing later. A stable temperature helps match the oil phase more easily.
Holding the right temperature is important for the next stage. It helps both phases blend well when combined. This step also keeps your lotion smooth and reduces separation issues.

Step#4 Heat the Oil Phase (Phase B)
The oil phase holds the oils, butters, and emulsifiers that give your lotion body. Heating this phase helps melt solid ingredients and prepares them for mixing with the water phase. This step also supports a smooth and stable texture in the final product.
Prepare the Oil Phase Ingredients
- Combine Oils, Butters, and Emulsifiers: Place your chosen oils, fatty alcohols, and emulsifiers into a heat-safe container. These ingredients form the structure of your lotion and help control thickness. Mixing them now prepares the phase for even heating.
- Check Ingredients for Purity and Freshness: Review labels, look for discoloration, and confirm expiration dates before heating. Fresh materials melt better and support cleaner blending. This also helps ensure the final product stays stable over time.
Preparing the oil phase well helps your team avoid issues during heating. It creates a smooth base and reduces clumps when the ingredients melt. This preparation also supports a better emulsion in the next step.
Heat the Oil Phase to Match the Water Phase
- Heat to 70–75°C (158–167°F): This range melts solid ingredients and prepares the oils to blend with the water phase. Matching the same heat level also reduces the chance of separation. It helps both phases combine smoothly later.
- Keep the Temperature Steady While Heating: Use a controlled heat source, such as a double boiler or heating tank. Steady heat keeps the emulsifiers fully melted and prevents hot spots. This makes the mixing stage more predictable and reduces errors.
Matching the right temperature is key to forming a stable lotion. When both phases reach the same heat, they blend more easily and form a better emulsion. This step also helps you build a smooth and even batch.
Step#5 Emulsification: Combine Phases A & B
This is the stage where your lotion begins to take shape. You bring the hot water phase and hot oil phase together to form one smooth mixture. A steady hand and the right timing help prevent splitting and other common issues.
Blend the Two Phases Together
- Slowly Add the Oil Phase Into the Water Phase: Pour the oil phase into the water phase at a steady pace. This helps the emulsifier bond the two phases and prevents early separation. A smooth pour supports an even structure in the final lotion.
- Use a High-Shear Mixer or Stick Blender: These tools help break down droplets and blend the phases into one emulsion. High shear creates a finer texture and a more stable batch. It also helps prevent graininess or air pockets.
Build a Stable and Even Emulsion
- Mix for 3–7 Minutes Depending on Batch Size:
Short pulses help control temperature and avoid trapping air. The goal is a smooth, creamy texture that holds together. The right mixing time supports long-term stability. - Watch for Viscosity Changes While Mixing: The lotion will begin to thicken as the emulsion forms. Look for an even texture with no oil floating on top. This shows that the emulsifier is working well.
At TY Cosmetic, we have guided many brands through this exact emulsification stage. As a manufacturer, we often help clients fix broken batches and understand how to create a stronger emulsion. If your team needs support with this part of production, you can reach out to TY Cosmetic to receive clear, simple guidance for your next batch.
Step#6 Controlled Cooling Phase
Cooling helps your lotion form its texture. This stage also protects the emulsion you created in the previous step. Slow and steady cooling keeps the batch smooth and stable.
Cool the Batch at a Steady Pace
- Lower the Temperature Slowly While Mixing: Gentle mixing helps the batch cool even on all sides. This prevents separation and keeps air bubbles low. It also protects the structure of the lotion as it thickens.
- Use a Controlled Cooling Method: Cooling tanks or simple room-temperature cooling both work, as long as heat drops evenly. Sudden temperature changes can weaken the emulsion. A steady drop creates a more consistent product.
Cooling the batch with care helps the lotion develop its body. This stage is where the texture starts to form, so even cooling is important. A controlled pace also keeps the batch easy to work with in the next step.
Monitor Key Changes During Cooling
- Watch for Texture Thickening: The lotion will slowly become more creamy as heat drops. This is a normal sign that the emulsion is holding. A smooth and even thickness shows your batch is on the right track.
- Check for Separation or Oil Spots: Look closely for any oil rising to the top. Early signs of separation tell you the emulsion needs more mixing. Small checks help you fix problems before the batch cools too much.
- Keep the Mixer at Low Speed: Light mixing keeps the batch uniform and prevents clumps. High speed can add air or break the emulsion. A gentle speed supports a cleaner final product.
Monitoring the batch during cooling helps catch issues early. Small corrections at this stage can protect the whole batch. It also helps you move into the next phase with better confidence and fewer adjustments.
Step#7 Add Heat-Sensitive Ingredients (Phase C)
This step is where your lotion gains its final benefits and character. Add the ingredients that cannot handle high heat, such as actives, preservatives, and fragrance.
Many brands find this stage important because these ingredients can change the feel, scent, and performance of the product. A careful approach here helps ensure your lotion works the way you planned.
Prepare Heat-Sensitive Ingredients
- Wait Until the Batch Reaches 40–45°C (104–113°F): This range protects actives and ensures preservatives stay effective. High heat can break down these ingredients and weaken the formula. Cooling first helps keep the performance steady.
- Use Clean Tools and Containers to Hold These Ingredients: Heat-sensitive items can react to small contaminants. Using clean tools protects the quality of each additive. It also helps keep your batch safe and consistent.
Add the Ingredients Slowly and Mix Gently
- Blend Actives, Preservatives, and Fragrance Evenly: Add each ingredient one at a time to prevent clumping. Slow addition helps the formula stay uniform and reduces texture issues. This supports an even feel across the whole batch.
- Use Low-Speed Mixing to Protect the Emulsion: Strong mixing can break the structure you built earlier. Low speed keeps the emulsion stable while spreading the ingredients evenly. It also prevents air bubbles from forming.
- Check the Batch for Any Signs of Reaction: Look for color change, separation, or sudden thinning. These early signs tell you if an ingredient is not blending well. Quick checks help you adjust while the batch is still warm and workable.
Adding heat-sensitive ingredients with care gives your lotion its final personality. This stage shapes the scent, feel, and function of the product. When handled well, it helps create a stable batch that meets your brand’s quality standards.
Step#8 Final Mixing, Homogenization & Texture Adjustment
This step helps your lotion reach its final feel. You make small changes to improve smoothness, thickness, and overall stability. At this stage, the batch should already be cooled and mixed, so your adjustments can be more precise. Many businesses treat this step as quality control before moving to pH testing.
Smooth the Batch With Final Low-Speed Mixing
- Use Low-Speed Mixing to Even the Texture: Gentle mixing helps remove small clumps and spreads ingredients more evenly. This step keeps air out and protects the emulsion you built earlier. It also prepares the batch for a clean, stable finish.
- Check for Air Bubbles or Uneven Spots: Air pockets can affect the appearance and feel of the lotion. A slow mix helps release trapped air and smooth the surface. This also makes filling and packaging easier later.
Final low-speed mixing helps settle the batch. It creates a smoother texture and supports a more uniform product. This simple step also helps catch issues before they become bigger problems.
Homogenize When Needed for a Finer Texture
- Use a High-Shear Mixer for a Short Time: A brief homogenization pass can create a finer, more silky texture. It breaks down any small droplets that remain. This strengthens emulsion and improves long-term stability.
- Avoid Overmixing to Protect the Formula: Too much shear can weaken the emulsion or add unwanted air. A short and controlled run works best. This helps maintain the natural body of the lotion.
Homogenizing the batch is optional but useful when you want a more polished product. It helps your lotion feel smoother and more premium. Many brands use this step to reach a texture that matches their target market.
Adjust the Viscosity and Final Feel
- Add Thickeners or Adjust Water Content as Needed: If the batch feels too thin, add a small amount of thickener or fatty alcohol. If it feels too thick, a small amount of water can help. Slow adjustments keep the product balanced.
- Check Texture Against Previous Approved Batches: Compare the batch to your records or reference samples. A quick check helps you match your brand’s standard texture. This supports product consistency across all runs.
Adjusting viscosity helps you hit the exact texture your brand wants. It also gives you more control over the final feel of the lotion. This step ensures your product meets expectations before moving forward.
At TY Cosmetic, we work closely with businesses during this stage because texture issues are one of the most common concerns in lotion production. As a manufacturer, we help brands fix uneven batches, adjust viscosity, and create a smoother, more stable finish. If your team needs hands-on support with texture or stability, we can guide you through the process in a simple and practical way.
Step#9 pH Testing & Adjustment
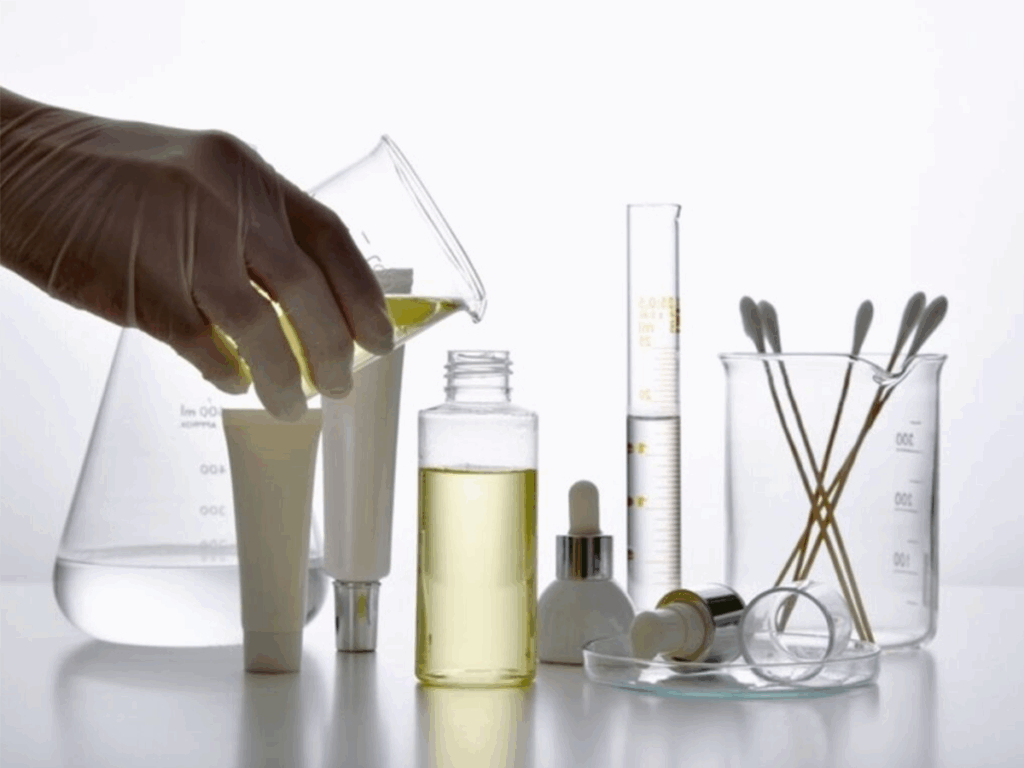
This step makes sure your lotion is safe for skin and stable over time. Testing the pH helps you confirm that the formula sits in the right range before packaging. A small adjustment now can prevent problems with irritation, spoilage, or preservative failure.
Test the pH of the Batch
- Use a pH Meter or High-Quality Test Strips: A pH meter gives the most accurate reading, especially for cream-based products. Test strips work, but they are less exact and harder to read with thick formulas. Using the right tool helps you avoid misreading the batch.
- Test When the Batch Has Fully Cooled: pH levels can shift as the lotion cools. Testing too early may give you the wrong number. Waiting until the batch reaches room temperature helps you get a stable and correct reading.
Adjust the pH to the Ideal Range
- Use Citric Acid or Sodium Hydroxide for Small Changes: Citric acid lowers pH, and sodium hydroxide raises it. Add only a small amount at a time to avoid big shifts. Slow adjustments help you reach the right range without damaging the formula.
- Aim for a pH Between 5.0 and 6.0: This range matches the skin’s natural level and supports most preservatives. Staying here helps your product stay gentle and effective. It also reduces the chance of irritation.
Adjusting pH helps lock in quality and protects the lotion during storage. It also helps your team follow a clear standard for every batch. Once your pH is correct, the product is ready for the final step: filling and packaging.
Step#10 Filling & Packaging
This is the final step where your lotion is placed into its container. A clean and steady process protects the product and keeps each unit consistent. Proper filling also helps your brand present a professional and reliable finished product.
Prepare Containers and Filling Tools
- Sanitize All Bottles, Jars, and Equipment: Clean containers protect the lotion from contamination during filling. Even small particles can affect shelf life and texture. Sanitizing everything helps keep the product safe until it reaches the customer.
- Choose Packaging That Fits the Product Type: Pumps, tubes, and airless bottles handle lotion well and protect the formula from air. Each option offers a different level of cleanliness and ease of use. Picking the right packaging supports your brand’s needs.
Fill, Seal, and Store the Finished Product
- Fill Containers While the Lotion Is Still Warm and Fluid: Slight warmth helps the lotion flow better into bottles or tubes. It reduces bubbles and gives a cleaner finish. A smooth fill also helps reduce waste.
- Seal the Packaging and Add Final Labels: Secure caps, pumps, or lids to protect the product from leaks or exposure. Labels should include batch numbers, dates, and ingredient lists. Clear labeling supports traceability and GMP.
- Store the Finished Units in a Cool, Dry Area: Keeping products away from heat and sunlight helps protect their texture. Stable storage also extends shelf life. A clean room helps maintain product quality before shipment.
Filling and packaging complete the production process and prepare the lotion for use. This final stage protects your hard work and keeps your product consistent. Once stored properly, the batch is ready for delivery, testing, or distribution.

Conclusion
The salon owner who struggled with watery lotion now understands each step of the process. She learned how heating, mixing, cooling, and testing all work together to create a stable product.
This guide helps you follow the same steps with more confidence. Every part connects to the next, giving you a clear path from raw materials to finished bottles.
If you want support with your own production, we can help.
At TY Cosmetic, we guide brands through each stage and make the process easier to manage. Contact us today!